This week’s module covered geoprocessing with Python using
the ArcPy package. ArcPy is a collection of modules as well as functions and
classes that enhance Python's capabilities. To start working with ArcPy we
first need to import the package by using the line of code import arcpy. Once
arcpy is imported all geoprocessing tools found in ArcGIS Pro can be run.
The subsequent step involves configuring the workspace to
the default location designated for the input and output files that will be
utilized in our tasks. This can be accomplished by employing the
arcpy.env.workspace function. The syntax to be followed is
arcpy.<class>.<property>, where 'env' is classified as a class, and
'workspace' serves as a property of this class.
Module 4 exercise focused on geoprocessing with ArcGIS Pro,
we utilized the Clip tool from the analysis toolbox to clip the soils shapefile
with the basin shapefile. Subsequently, we performed a batch process using the
Clip tool to clip multiple shapefiles, including flood zones, lakes, rivers,
and roads. Additionally, this exercise provided us with the opportunity to
learn how to configure geoprocessing options and to explore models and the
ModelBuilder feature in ArcGIS Pro.
In the lab assignment, we undertook two primary tasks. The
first task involved the creation of a model designed to identify all soils
within the basin shapefile feature that are currently or potentially suitable
for agricultural purposes. The second task required the development of a script
to execute three geoprocessing functions utilizing ArcPy.
To initiate the first task, we ensured that the option to
"Allow geoprocessing tools to overwrite existing datasets" was
enabled. This setting can be configured via the options menu under
geoprocessing. We then created a new project and incorporated the shapefiles
for soils and basin into a new map. Subsequently, we established a new toolbox
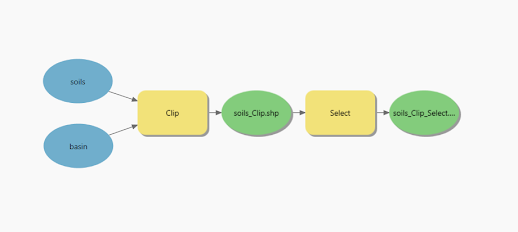
and a new model named "SoilErase." Locating the Clip tool within the
geoprocessing analysis toolbox and adding it to the model. Double-clicking on
the Clip tool, to accessed the tool dialog box, where we designated
"soils" as the input features and "basin" as the clip
features. Upon executing the model, a new shapefile, "Soils_Clip,"
was generated and saved in the default directory, and added to the project.


The second task required the development of a script to execute three geoprocessing functions utilizing ArcPy. There are various approaches to complete this task effectively. Initially, I duplicated the existing shapefile from the Data folder to the Result folder. This practice guarantees that the original layer remains untouched and serves as a backup. Subsequently, I incorporated the XY coordinates into the new shapefile. Following this, I proceeded to create a buffer and, ultimately, performed a dissolve operation. Although the Buffer and Dissolve processes can be executed in a single statement, I chose to implement them as two distinct statements. This decision allows for the generation of two separate layers for the buffer: one containing all individual buffers and the other representing the dissolved buffer.

Running the code from Notebook ArcGIS Pro

Running the code in Python IDLE

No comments:
Post a Comment